This is Part 11 of my annual special Daily Golden Nugget "Holiday Run-Up" series packed with tactics to help you during November and December this year. I started this series 3 weeks ago with directions for all the initial steps needed to prepare for the information you'll find in these last few run-up days. The initial marketing strategies overview is here.
Throughout this run-up series, I've been explaining how to take a single product and build a micro-campaign around it. Today I'm looking at a few simple Pinterest tactics to weave into that micro-campaign.
Pinterest Photos
The first thing you need to understand about Pinterest is how they display their photos. They use an infinite scrolling layout that grows longer and longer as you scroll down. They display columns of images side by side with a different number of columns appearing depending on your screen size. A smartphone might only show one long column of photos, yet my desktop computer displays 7 columns side by side.
Although you can post any size photo to Pinterest, the tall thin images work best in their layout design. Infographics and stacked photos showing different stages or steps in your work always attract a lot of attention. The Pinterest image format also works very well for displaying long dangling earrings and necklace photos.
Every photo you upload is resized to fit the default width of their network, which, as I said, really relies upon the width of the device screen you are using. Take advantage of this and crop your photos to be tall and thin.
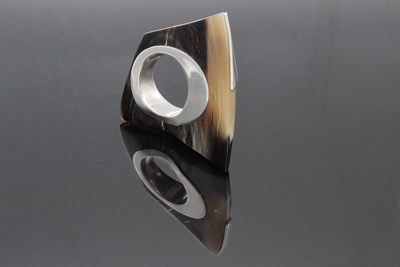
Here's a photo of a Casuso Designs ring I want to post to Pinterest:

As you can see, this ring was shot on a black mirror with a lot of space to the right and left where text can be added. As is, this will work well as a post card or some other print media ad, but the format won't work on Pinterest.
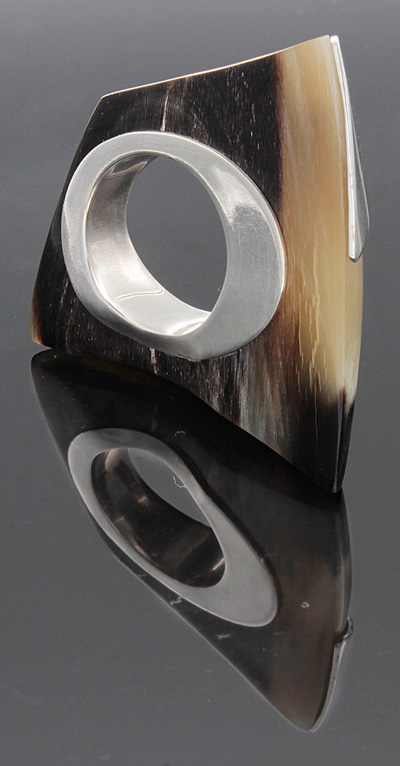
Instead we can crop it to be tall and thin like this:

Both images are the same width, but the cropped version revels a lot more detail of the ring, especially the grains in the cow horn.
Pinterest Boards
Users of Pinterest share images into organized groups called "boards." All the images within a single board are related to the topic of that board. Successful jewelers have boards relating to different aspects of a wedding, like gowns, flowers, and centerpieces because those wedding related board attract attention.
Those same successful jewelers also have boards dedicated to different designer lines of jewelry. Some jewelers even create several boards for one designer to showcase earrings, rings, and bracelets into different groupings.
You should have a board for every one of your own designers and for any of the jewelry you create yourself. Don't be surprised if you end up with nearly 200 different boards; just make sure you add pins to each one.
Social Media Updates
Depending on who you listen to, you'll hear people say that posts to every social network have a limited lifespan. Some people say you need to have an aggressive posting schedule like this one in order to stay competitive.
I don't have specific measured figures myself, but I have noticed that Tweets have the shortest lifespan, perhaps as short as 8 minutes. Facebook seems to have the next shortest lifespan. The hashtag and follower nature of Instagram and Google+ seem to give them a slightly longer lifespan, maybe even as much as a day.
On the other hand, the lifespan of a Pinterest pin seems to be YEARS! That's a fact that I can prove!
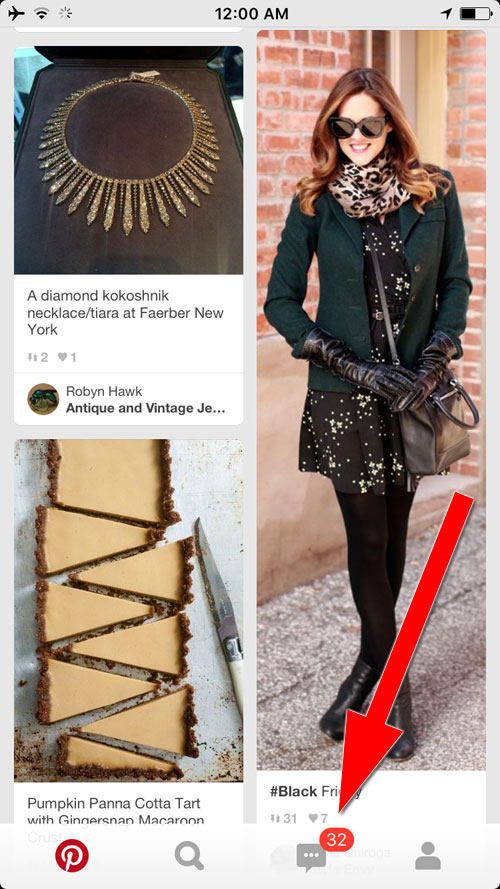
As I write this today, my personal Pinterest account only has 767 pin across 46 boards. I have a mixture of images from every one of my Daily Golden Nuggets, infographics, and several boards with engagement rings. Here's a screen shot from my Pinterest app to show you how many messages I have waiting for me:

The "32" you see in that image are the notifications that people are repining my pins. My most popular pins are the engagement rings I posted back in 2012 and the infographics I posts about the same time. People find them again and again because of the name and descriptions I gave the board and every image I pin. Every time I log into Pinterest I'm greeted with at least 10 repin notices.
The important lesson there is to make sure every one of your pinned images has a description. That's the key to increasing your Pinterest pin lifespan to a few years long.
Showing Steps and Progress
Pinterest is well known for showing do it yourself images or milestones through a project. You accomplish this by stacking several photos on top of one another showing each step.
As a quick example I pulled these 4 photos from Casuso Designs together as a single, very tall image:

The top photo shows the cow horn in its natural state. The second photo shows it being polished. The third photo shows it being cut, and the last photo shows the finished product. This is just an example to illustrate the concept; I would suggest several other photos at other milestone points.
Website Linking
When pinning photos into the wedding boards it's okay to directly upload or share pins from anywhere, but you need to take a little more care when posting pins of your own products.
All you product pins should include a link back to either your product catalog, or an in depth blog post about that product.
Some people will tell you to simple go to your website and pin an image directly from your site to Pinterest; while that is common practice, that doesn't further the goal of the micro campaign concept I've been explaining through this run-up.
The micro campaign concept is for you to post different photos to different social networks so you have a chance to tell different parts of the product story to your followers. Accomplishing this requires you to directly upload from your computer while including a link back to your site in the description.


