
In this Daily Golden Nugget, I'm going to analyze the photography of a popular e-commerce jewelry site. In this exercise, I hope to reveal some aspects of photography that you can apply to the photography on your own jewelry website.
For this exercise, I'm going to search Google for the Verragio style INS-7074R. This is a very popular engagement ring style and it's easy to find many different website selling it. What I hope to find is a website that took its own photos instead of using the photos supplied by Verragio.
From the Google SERP, I found the INS-7074R style on the Verragio website. Here's a screen shot of that page with the product image:

This is the default product image that Verragio supplies to every jeweler who asks for it. In fact, you can see the same image used on the next website I found here:

The third website I found was also using the same images as you can see here:
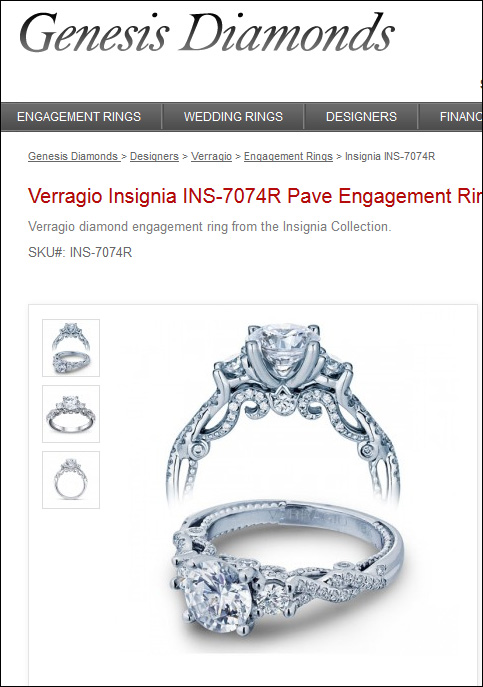
None of these websites has the ability to zoom in very close to show the detail of the ring, and that's because Verragio supplied the same image to all of them. Surprisingly enough, the Verragio website doesn't even have the ability to zoom in close to see the fine detail of this ring.
I found the Whiteflash.com website next. I've often used the Whiteflash website in my live jewelry seminars because they take their own photography on black backgrounds. Here's a screen shot of the page I found:

(click to enlarge)
White background photos would have too high of a contrast against the dark design of the Whiteflash site, and it would look jarring. Their choice to shoot all their photos against a black background works for their website.
They are using 4 different product shots on a black background, one photo on a flower, and a 6th photo of the ring being worn. Let's look at each...
Product Photo 1
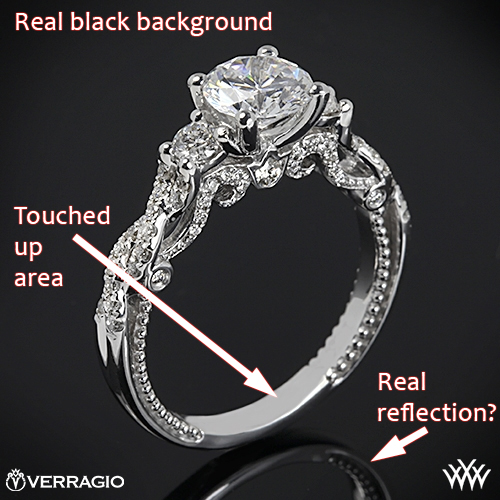
They've chosen this photo as the primary image that's seen when you first visit this product detail page. It was shot on a mirrored black surface in such a way that a real reflection can be seen directly under the ring.
I can tell this ring has been Photoshopped a little because the inside of the ring was smoothed out to remove the VERRAGIO 18K stamp that you can clearly see in the photos of all the other sites. Also, there's no sign of wax or glue holding the ring upright.
I'd like to say that the reflection is real, and at first I thought it was. But I have some doubts after close inspection in Photoshop. However, I had to try really hard before I had doubts because it does look real. Perhaps cleaning the Photoshop process to remove the glue also ruined the natural reflection, so they recreated it.
Honestly, it doesn't matter. The photo looks good the way it is and a website visitor will not scrutinize it as much as I have.
Product Photo 2
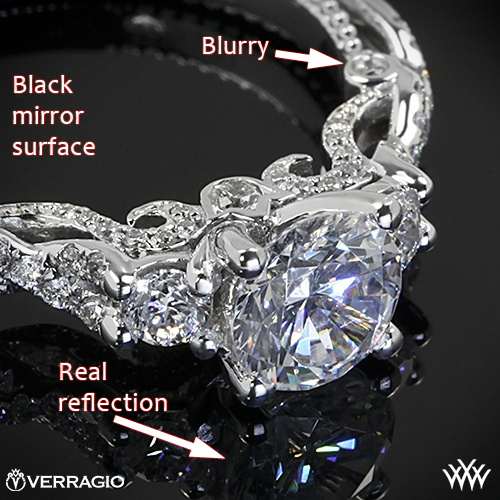
Some websites provide an interactive zoom feature but Whiteflash chose to provide a static close up photo of the center diamond and the taper design.
For this photo, the ring was laying down on its side without any need for glue or wax to hold it in place. I can tell the reflection here is real, and that it was shot on a black mirror glass inside a white light tent or lightbox.
As a zoomed photo, I would hope to see all the finite details possible, but this photo is out of focus in the upper right area of the frame. This is caused by the camera not having a great enough depth of field when the shot was taken. Camera depth of field is controlled by the aperture, or F-stop setting. The F-stop setting controls how much of your subject will be sharp in front of, and behind, your focus point.
What they needed here was a larger F-stop for this shot to increase the focus area further to the back. Another option would be to slightly change the focal point a little further back from where it was.
I'd like to point out that this zoomed shot is much better than the standard images provided by Verragio.
Product Photo 3
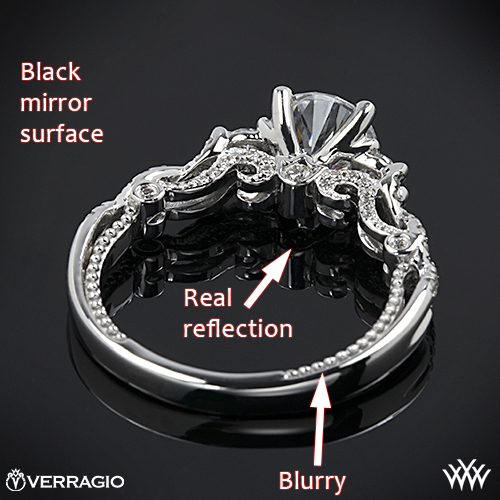
I always like seeing product photos oriented like this. It's an extra level of detail that customers are interested in, but rarely available online.
Again, this photo is shot on a black mirror surface inside a light tent or box. From the reflection on the ring, I can now tell that the side of the box with the camera seems to also be black or gray. While light boxes do help create even light around your subject, open sides will produce black reflections that can help or hurt your photograph.
In this case, I feel that the extra back reflections help identify the various contours of this ring.
This photo is not fully in focus. The bottom of the shank (the bottom part of the ring) is blurry while the area towards the diamond head is sharp. An increased F-stop, perhaps F16 or greater, would fix this.
I do need to mention a few words of caution as you experiment with setting greater than F16. You will need a tripod, higher ISO settings, and a strong light source. You will need to put your camera in Aperture Priority mode (That's the Av setting) and you might also need to compensate your exposure up by 1 or 2 steps to prevent it from being too dark.
Product Photo 4
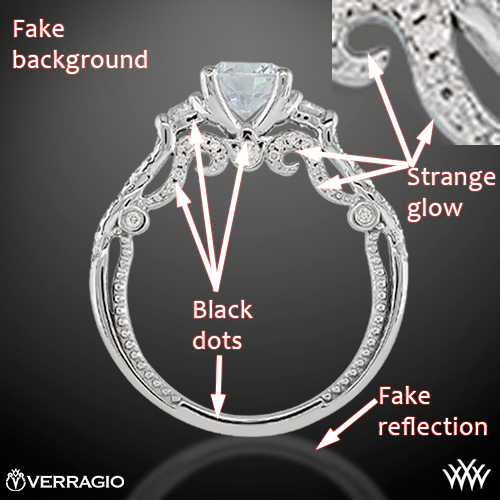
They tried way too hard with this one! This is a straight side view shot of the ring, but it looks like it was shot on a white background. There's an unnatural looking glow all around the ring edges, which to me, looks like they tried really hard in Photoshop to mask out the white background then replace it with a radial gradient.
Although the reflection is obviously unnatural, it was added simply to give the ring some perspective.
This photo also has several visible black dots. These black dots were also apparent to me in the previous 3 photos, but shooting on a black background created additional black reflections that hid these dots well. Believe it or not, those black dots are the reflection of the camera lens on the shiny surface. They are clearly visible because this was shot on a white background.
I'm not sure why this side view was shot differently than the others. I find it very distracting and I feel that a customer would not spend too much time looking at it because it so different than the others.
Product Photo 5
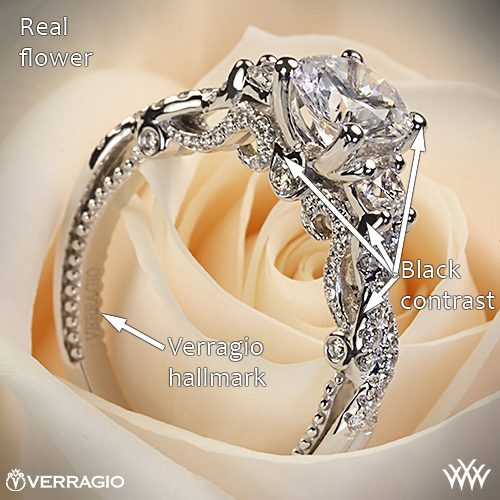
I'll call this one their "editorial shot," meaning that this is the photo they would use on a magazine cover, in a magazine ad, or for their in-depth blog write-up and review.
Jewelry photographs with interesting backgrounds are used to draw attention, but that's all that they are used for. You can't expect to sell your jewelry if you only have an editorial shot, and that's because the extra background color will overshadow the true color of the jewelry.
The light yellow color of this rose is reflecting on the inside surface of the ring, which is how I know this is an actual shot of the ring placed on the rose. From experience, I'll tell you that, if you want your jewelry to appear in ads with flowers, then you better shoot them together instead of Photoshopping different flowers with the jewelry. Photoshopping afterwards never works. It looks awful.
I'm guessing that there was very little post-processing done on this photo because the original Verragio hallmark stamp is still visible inside the shank.
I've also pointed out areas of black contrast reflections in the ring. If I were shooting this photo, I would test another shot and try to cover up those black reflections. However, that black contrast does help provide an easy distinction between the light rose color and the white metal ring.
Product Photo 6
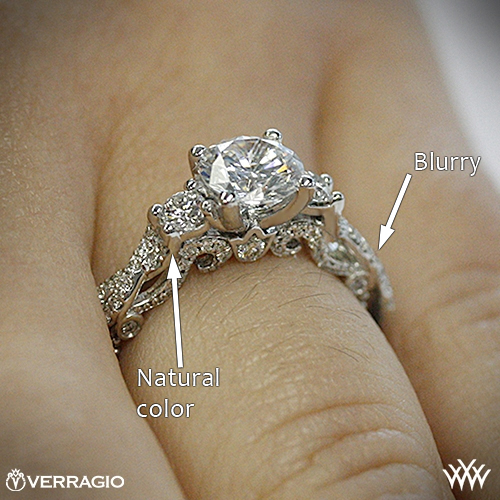
This last photo is all about sizing and experience. It clearly shows how it would fit on a hand and how the skin tones would reflect off the ring to provide a natural coloring.
What I don't like about this photo is the blurry area on the right side. This could have been fixed with a greater F-stop setting on the camera.
Photo Conclusions
Given the choice to purchase from the website with the generic looking rings, or the one with multiple angles and views, other industries seem to have better success with the multiple photos like those used on Whiteflash.
Getting organized is the hardest part of your photography process. It will take you a while to pick the camera and the lenses, and learn how to shoot your photos. There are online services that you can pay to cleanup your photos if you don't have the time or skill to use Photoshop yourself. You can search Google for image editing service, image masking service, or image cleanup service.
Lastly, if you haven't yet read yesterday's nugget about product photos and information please go back and do that now.


