This is the third part of my Daily Golden Nugget series outlining a potential marketing plan for the upcoming holiday season. The first part explained how to select the items to promote during the holidays. The second part detailed how to set up your newspaper, direct mail, and email campaigns.
Today, I'll explain the tactics for online paid advertising and social media.
Choosing Which Products to Advertise Where
You should be starting this marketing campaign during the week of November 17th or November 24th this year; in which case you will have 5 or 6 weeks of newspaper ads, but you might have more than 6 styles in your suite of chosen items. In this case, you will be using social media to build an interest in the items you don't advertise through print or email.
Every item that you've built blogging and video content for will be promoted through at least one method. The items you'd like to promote the most are the one you will be using in the print ads and emails.
Please refer to this previous Nugget for Marketing Steps 1 - 3.
Marketing Step 4: Plan your Google AdWords Express
I'm suggesting that you use Google AdWords Express to promote your campaign for the holiday season instead of using Google AdWords. Google AdWords is probably the better choice, but their continual changes to how the system works will make it difficult for a small business owner to implement without hiring an agency to manage it for them. Instead, I'd like to refer you to these directions for setting up Google AdWords Express at a much lower cost.
You can set up 1 ad for every item in your holiday campaign, and maybe even 1 general ad for your home page. During one of the setup steps you will have the choice to either select your Google+ page, your home page, or enter a custom URL. Since these ads are geared towards holiday shoppers it will make the most sense to use your product detail page in the ad.
At one point during the Express setup, you will have to option to "Connect with your Google Analytics account to see what customers do on your website." Make sure to select this option so you properly track your results.
Marketing Step 5: Schedule Your Google+, Facebook, and Twitter posts
I use the program Hootsuite to schedule social sharing to Google+, Facebook, and Twitter. I suggest checking it out and setting up an account of your own.
Through Hootsuite, you will coordinate the sharing of a specific item's blog post to Google+, Facebook, and Twitter during the week when that item is being advertised via email and offline. It doesn't have to be the same day that the print ads are sent, but it could be if that's easiest for your schedule.
If you have more than 6 items in your holiday campaign, then you will have to set up additional schedule days when you share the links to those blog posts. Try to space out your social sharing so you don't overwhelm your Facebook and Google+ accounts.
On the other hand, feel free to share to Twitter once every 8 hours, every day. There's more of a chance to reach your followers when you share several times in a day.
Every link you share should have UTM tracking variables added to them. Hootsuite has a built-in URL shortener, but you can still use other URL shorteners. The UTM variables should include the date when the post will be shared. People will find and click these social media shared posts for several months, so adding the date will allow you to see compare the posting date to the click dates shown in Google Analytics.
Marketing Step 6: Staging Your YouTube Videos
The video directions I gave you the other day said to upload the 90 second videos to YouTube and then take the embed code to use on your blog pages. Go back and look at your YouTube settings and make sure all your videos are set to public view.
YouTube will invite you to share your videos to Google+, but don't do that until day you've scheduled to post the blog to Facebook, Google+, and Twitter. Sadly, this is a manual process, so make sure to set a reminder in your smartphone or write it on your calendar. Then, on the day of the reminder, go back to YouTube and share the video to your Google+ account.
The sharing step will give Google+ users a faster way to find the videos that are related to the shared blog posts from that same day.
Marketing Step 7: Marketing Your Videos on Facebook
For this year's campaign, you will be uploading those 90 second videos you made. Even though they are already published on YouTube, you're going to upload them into Facebook too using the Upload Photos/Video option you see here:

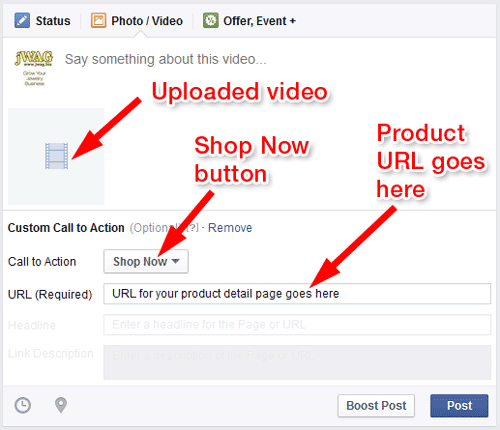
When uploading them to Facebook you you'll then create a Custom Call to Action with either a Shop Now or Learn More button. If you use the Shop Now button, then you should direct that to the product detail page URL as shown here:

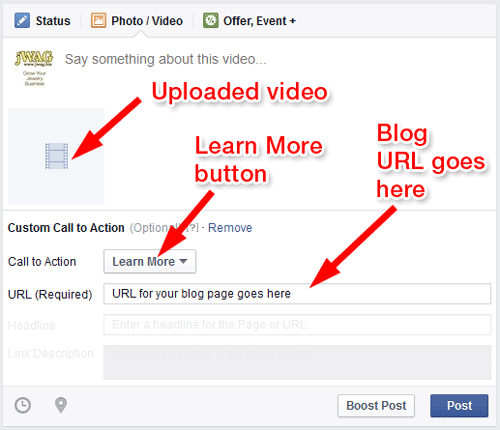
If you use the Learn More button, you should direct that URL to the blog page as shown here:

For both URLs, you need to add UTM tracking to it; otherwise, you won't be able to correctly track the results in January.
You will then boost this video post.
It's going to be easy to oversaturate your Facebook page with the same products, so don't upload these videos on the same day when you are sharing the blog as outlined in Step 5 above. You should schedule a different product instead.
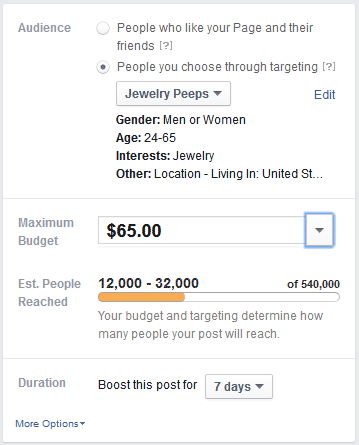
In previous nuggets, I've explained how you should segment your Facebook ads to target specific customers. During the holiday season you'll want to create a target segment that only includes an age range, an interest in jewelry, and within a specific location.
In this example, I'm showing a target audience of people between the ages of 24 - 65 with an interest in jewelry:

You'll want to offer Facebook a reasonable amount of money for your boosted post too. The above screen shot shows $65 for 7 days. Remember that you will have overlapping sponsored posts if you have more than 6 items in your holiday campaign.
Marketing Step 8: Social sharing to Instagram
Sharing to Instagram is supposed to be fun. Instagram users like to visually consume pretty pictures and interesting things. You'll need to make this fun for yourself too because you'll never do it if it feels like work.
You can use Instagram to show off the jewelry in an interesting way. The photos won't be perfect because they are coming from your smartphone, so don't worry too much about perfect lighting or the entire picture being in focus. Just make sure the jewelry is in focus and can be seen.
Doing a quick search on Instagram for the #jewelry hashtag will reveal millions of jewelry related posts. Feel free to copy some of the raw photo techniques from other users as a way to create engaging jewelry photos. Personally, I like the photos where jewelry and accessories are laid out on a bed or on the floor showing how well they all match together.
For Instagram, to be effective you'll need to include a brief bio for your account that includes your website address. You can't share URLs in the captions of the photos, but you should give some details of the style in the photo and you can say "visit our website for more information."
Through Instagram, you will build a following of people who like the photos you're posting. Set up more reminders for yourself using your wall calendar or a smartphone calendar so you know when to post photos that relate to this specific campaign. Between campaign posts, you should also weave in additional photos from around your store and other jewelry.
Instagram is a great place to show the human side of the store. Show some photos of you and the other employees behind the counter, working at the bench, and modeling the jewelry. Every other part of this campaign is focusing on driving sales, but this part of the campaign is meant to humanize you and build character. The modern shopper wants to see this side of you, so don't skip this.
Marketing Step 9: Pinterest Boards for this Gift Suite
You can post 3 photos for each item that you've included in the holiday campaign suite. The first photo comes from the blog and it will have a brief description that you pull from the blog. You will link it to the blog page with UTM tracking as explained here.
The next photo will be the pure white or pure black background photo that you have on the product detail page. You should include a price as the first thing in the description so people can see it right away. If you have a business Pinterest account then you can take advantage of their Product Rich Pins. Link it to the product detail page making sure to add some UTM tracking as explained here.
The 3rd photo will be a single frame from the video. This one will be a little trickier to make. The easiest way to get a single frame would be to take a screen capture from your smartphone. You can upload the screen capture directly, but I want you to link this photo to your YouTube video and I want Pinterest users to know it's linked to a video. To do that you'll need to edit that screen capture in Photoshop and add one of those triangular play buttons to it. I haven't tested this method on Pinterest, but it's sure to look a little unusual and hopefully it will attract clicks to the video.
In tomorrow's Daily Nugget I'll go into some details on how to choose a few domain names to use as part of your tracking in print ads. Check back for the continuation...


