 In this edition of the Daily Golden Nugget, I'm returning back to the topic of Landing Pages to give you another easy example of how to set one up.
A "landing page" is usually single web page that you create for a specific purpose. Many times, a landing page is used in online banner ads, shared links to social networks, and pay per click advertising like Google AdWords.
A landing page should be designed to get someone interested in your product or service, but then give them links to additional information.
That said; let me illustrate this with a specific retail jewelry store example: custom jewelry
The first thing I need to do is figure out what URL to use for my custom jewelry page. I want to use one that will work no matter how someone shares the page, and that will work in any advertising system.
When thinking about URLs, I'm always trying to use the best tactics to entice people to click on Google AdWords ads. The green URL in those ads helps convince people to click, so you should always tie into that.
I'll use my fictitious website, perosijewelers.com, for the domain name in this example. I'd like to have the URL perosijewelers.com/custom-design appear in my AdWords green link.
Truthfully, I know that a web server can't create a page called "custom-design" because all real web pages need to have an extension of some type. In this case I could create a page using any of these file names and extensions:
/custom-jewelry/index.html
/custom-jewelry/index.htm
/custom-jewelry/index.php
/custom-jewelry/default.htm
/custom-jewelry/home.html
Your website might use something completely different, but the important thing to remember is that you want to be able to drop the actual file name and just use /custom-jewelry as URL.
Once you create the actual page on your website, you have to fill the page with interesting information that visitors will want to read.
I've created a 5 part template for you to follow. This is by no means the only way to set up a landing page, but it does clearly illustrate how you can structure your first one. The goal of this template is to convince your website visitor that you are a worthwhile jeweler that they should contact.
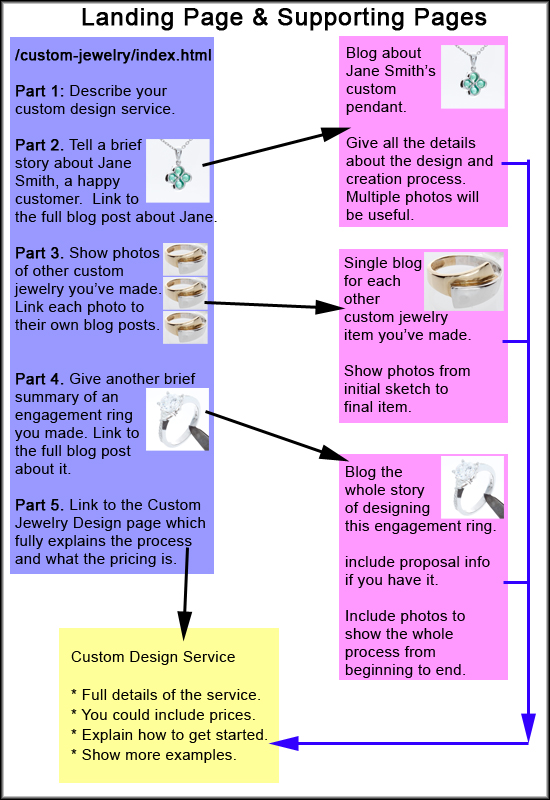
Here's a visual representation of the structure. Each part is explained below.

Part 1
The top of your landing page needs to have a headline and something to grab your reader right away. After the headline you need a brief description of how you provide the service. You will have to use your most succinct explanation of your custom design jewelry process.
Part 2
You should follow that short explanation with a brief summary of one of your custom projects. Make sure to include a photo of the item, the person's name (and the town they live in if possible), and a link to a more detailed blog post about that project. You can change the names of the people if needed, or leave out their last name, but the town name is important for local search results.
The blog you link to in this step should have all the details about this custom project. If possible, start with the original sketch from the customer. Follow that with photos from every step of the way. Explain each photo in detail so the reader understands what they are looking at. The conclusion of that blog post should show the happy customer wearing the item.
Part 3
The next part of the landing page should include a few more photos of other jewelry you've created. You don't have to give too many details on the landing page, but you must give a link to a full blog post for each one. If your readers are truly intrigued, they will want to read more details about each one. Make sure you link the actual photos because visitors to jewelry websites prefer to click on images to navigate.
Speaking of photos, those few photos can be smaller since you will probably have them right next to each other. But on the blog page you have to make sure the photos are large enough to see the fine detail. Follow the same directions I gave you above to show photos from start to finish on each of these supporting blogs.
Part 4
This next part will be another brief summary of the story about another specific item you made, I recommend an engagement ring. Include the name of the couple, what town they live in, and an excerpt from any testimonial they gave you. Include a photo and a link to a blog post with the full story.
On the blog page, you need to show their original sketch, followed by photos of each step you took to create their engagement ring. Include large photos with fine details and explain each one of them. Include the full testimonial they gave you. If the testimonial was actually a handwritten thank-you note, you should scan and include it, but you still need to transcribe it as text on the page.
Part 5
At the bottom of the landing page you should explain to the reader that they can either fill out a form to contact you, or you can tell them to click to another page, call it your Custom Design Service page, which fully explains how they can get started creating their custom jewelry and how the process will work for them from start to finish.
On the Custom Design Service page you should explain the different methods of custom design. For example, the process needed if you start from a sketch compared to the process of re-stylizing an existing item you have in your showcase. Make sure to include your deposit requirements on the website so it helps soften that part of the conversation in person.
You should consider putting a contact form of some type on the Custom Design Services page. Don't simply link over to your normal Contact Us page, use a specific form with fields related to custom jewelry design.
Part 6
I know I said this was a 5 part template, but there's an extra step that's illustrated in the diagram above that I need to point out. Make sure you include a link from each of the blog posts back to your Custom Design Service page. This will help complete the sales funnel process, and it leads them one step closer to filling out that special Custom Design contact form.
As I said above, this is just one simple landing page template. The way I've illustrated this here would take a total of 7 pages on your website. That's a lot of work, which means this is not something you can simply rush into doing.
Remember that landing pages are constructed specifically for online ad targeting. Although this example illustrated how to create a landing page for a single topic, many landing pages will tie in multiple topics. In the new world of SEO, landing pages don't rank very highly in SERPs if they have multiple topics.
Another point of note is that landing pages should not be included in your website's normal navigation, or even in your sitemap. Try your best to hide this page so your tracking will show the true results from your paid advertising.
Lastly, make sure you have good tracking on your landing page. You'll need Google Analytics at least, but I also suggest advanced user tracking.


